日期和时间
链接:日期与时间的教程
time模块
- time()函数获取当前时间戳
- localtime([seconds])格式化时间戳为本地时间,返回时间元组
链接:time模块
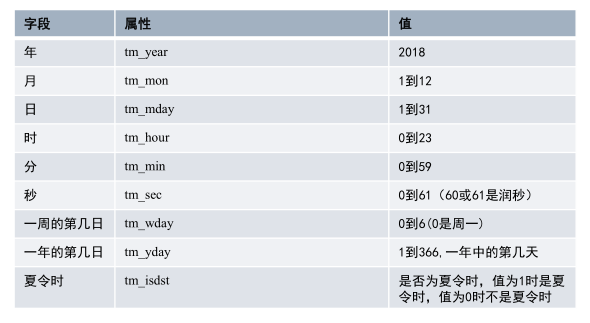
tm_isdst:是否为夏令默认为-1
实例1:
1 | import time; # 引入time模块 |
结果:
1 | 1523707408.4362438 |
实例2:
1 | import time |
结果:
1 | time.struct_time(tm_year=2018, tm_mon=4, tm_mday=14, tm_hour=21, tm_min=13, tm_sec=30, tm_wday=5, tm_yday=104, tm_isdst=0) |
实例3:
1 | #获取格式化时间 |
结果:
1 | 本地时间为 : Sat Apr 14 21:22:05 2018 |
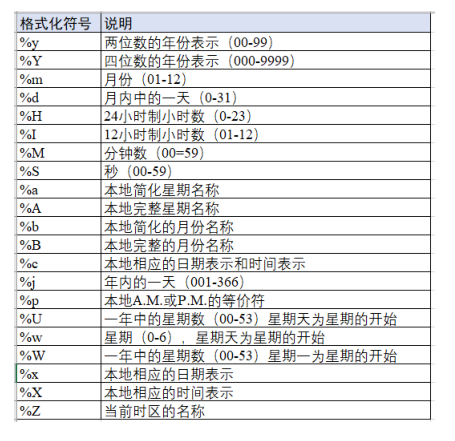
- time.strftime(format[,time_tuple])格式化日期函数
- time.strptime(string, format)将日期时间字符串转换为时间元组
- time.mktime(time_tuple)将时间元组转换成时间戳
实例4:
1 | # 格式化成2018-04-14 21:46:50形式 |
结果:
1 | 2018-04-14 21:46:50 |
- time.sleep(seconds)将程序睡眠等待几秒钟
实例5:
1 | #sleep(秒)程序睡眠时间 |
结果:
1 | 5.0000221729278564 |
datetime模块
链接:datatime模块
- datetime.datetime.now()获取当前日期和时间
实例6:
1 | #获取当前时间 |
结果:
1 | 2018-04-14 22:08:00.916396 |
- strftime(format)日期时间格式化
- datetime.datetime.formtimestamp(timestamp)将时间戳转换为日期时间
- datetime.datetime.fromtimestamp(timestamp)将时间戳转换为日期时间
实例7:
1 | #日期时间格式化 |
结果:
1 | 2018/04/14 22:11:13 |
- datetime.timedelta(时间间隔)返回一个时间间隔对象,通过时间间隔可以对时间进行加减法得到新的时间
实例8:
1 | import time |
结果:
1 | 2018-04-15 01:22:34.713639 |
实例9:
1 | #计算昨天的日期 |
结果:
1 | 2018-04-15 01:23:36 |
文件与文件夹操作
链接:python文件I/O
- open(文件路径,访问模式,encoding = 编码格式)方法打开一个已存在的文件,或者创建新的文件
1 | file object = open(file_name [, access_mode][, buffering]) |
- close()方法关闭已打开的文件
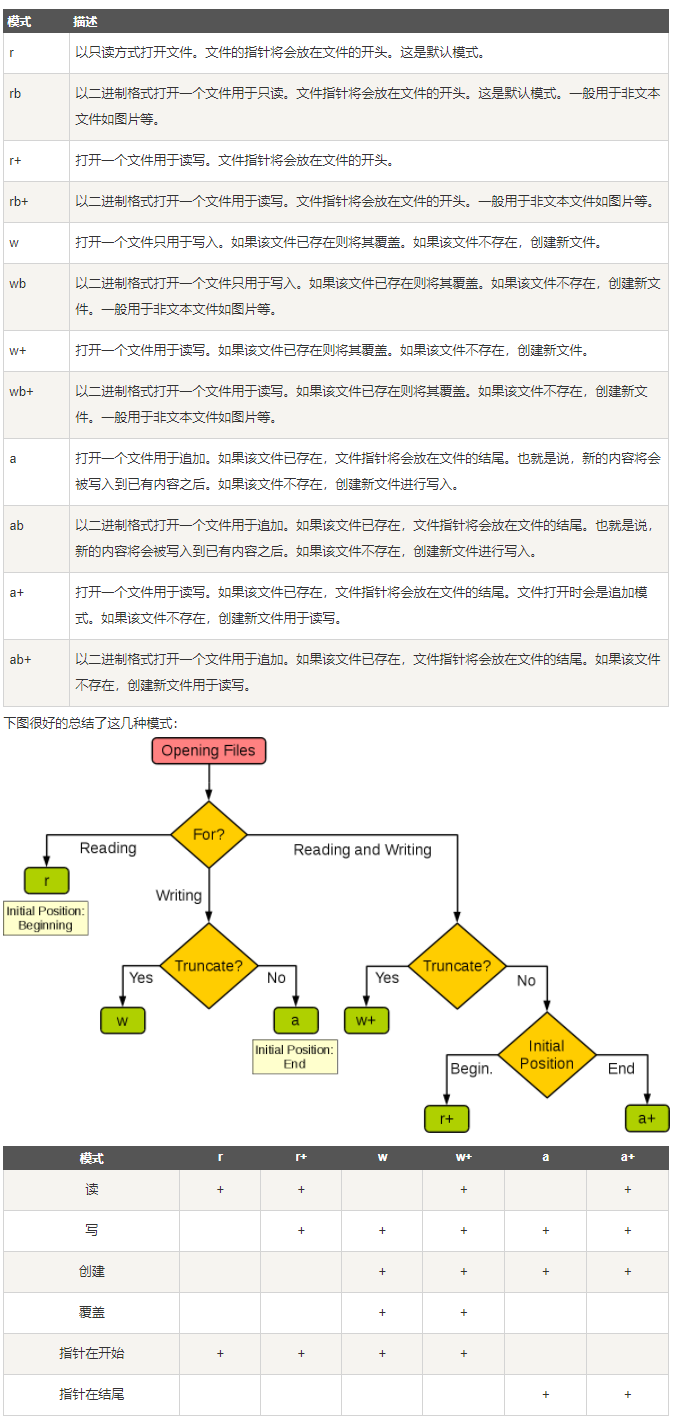
下表为access_mode不同参数打开文件的完全列表,取自菜鸟课程,点击上述链接可以获得。
1 | import os |
- 打开文件常用的三种访问模式
- r :只读模式(默认)
- w :只写模式
- a : 追加模式
- write(data)方法向文件中写入字符串
- read()方法读取文件全部内容
实例11:
1 | #read读文件 |
结果:
1 | 你好 |
实例12:
1 | f = open("test.txt","a",encoding="utf-8") #覆盖已存在的内容,encoding="utf-8"解决中文乱码 |
结果:
1 | 你好 |
- readlines()方法读取文件全部内容,放回一个列表,每行数据是列表中的一个元素
实例13:
1 | #readlines按行全部读取文件数据,返回一个文件数据列表,每一行是列表的一个元素 |
结果:
1 | ['你好\n', '大家好'] |
- readline()方法按行读取文件数据
实例14:
1 | #readline |
结果:
1 | 你好 |
- writelines(字符串序列)将一个字符串序列(如字符串列表等)的元素写入到文件
实例15:
1 | #writelines向文件写入一个字符串序列 |
结果:
1 | 张三 |
- os.rename(oldname,newname)文件重命名
- os.remove(filepath)删除文件
- 安全的打开关闭文件的方式(自动调用close方法):
实例16:
1 | # 用with open as f的语句 |
实例16:
1 | import os |
- os.mkdir(path) 创建文件夹
- os.getcwd()获取程序运行的当前目录
- os.listdir(path)删除获取指定目录下的文件列表
- os.rmdir(path)删除空文件夹
- shutil.rmtree(path)删除非空文件夹
- os.chdir(path)切换目录
1 | import os |
JSON格式文件操作
- 引入json模块:import json
- dumps(python_data):将Python数据转换为JSON编码的字符串
- loads(json_data): 将json编码的字符串转换为python的数据结构
实例17:
1 | import json |
结果:
1 | {"name": "zhangsan", "age": 20, "language": ["python", "java"], "study": {"AI": "python", "bigdata": "hadoop"}, "if_vip": true} |
- dump(python_data,file):将python数据转换为JSON编码的字符串,并写入文件
- load(json_file):从JSON数据文件中读取数据,并将json编码的字符串转换为python的数据结构
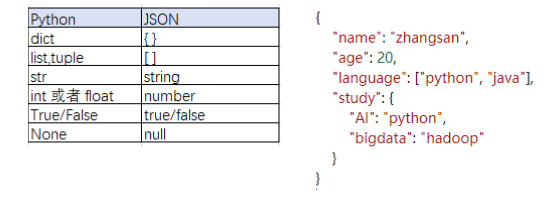
- python数据类型与JSON类型对比
实例18:
1 | #dump和load |
结果:
1 | {'name': 'zhangsan', 'age': 20, 'language': ['python', 'java'], 'study': {'AI': 'python', 'bigdata': 'hadoop'}, 'if_vip': True} |
CSV格式文件操作
链接:csv操作
- csv格式文件默认以逗号分隔
- 引入csv模块:import csv
- writerow([row_data])一次写入一行数据
- writerows([[row_data],[row_data],···])一次写入多行数据
实例19:
1 | ##csv文件操作 |
- reader(file_object)根据打开的文件对象返回一个可迭代reader对象
- 可以使用next(reader)遍历reader对象,获取每一行数据
实例19:
1 | #从csv文件读数据 |
结果:
1 | ["nam'''e", 'age'] |
- DictWrite和DictReader对象处理Python字典类型的数据
实例20:
1 | header = ["name","age"] |
结果:
1 | OrderedDict([('name', 'zhangsan'), ('age', '20')]) |
面向对象编程
链接:面对对象编程
- 类(Class): 用来描述具有相同的属性和方法的对象的集合。它定义了该集合中每个对象所共有的属性和方法。对象是类的实例。
- 类变量:类变量在整个实例化的对象中是公用的。类变量定义在类中且在函数体之外。类变量通常不作为实例变量使用。
- 数据成员:类变量或者实例变量, 用于处理类及其实例对象的相关的数据。
- 方法重写:如果从父类继承的方法不能满足子类的需求,可以对其进行改写,这个过程叫方法的覆盖(override),也称为方法的重写。
- 实例变量:定义在方法中的变量,只作用于当前实例的类。
- 继承:即一个派生类(derived class)继承基类(base class)的字段和方法。继承也允许把一个派生类的对象作为一个基类对象对待。例如,有这样一个设计:一个Dog类型的对象派生自Animal类,这是模拟”是一个(is-a)”关系(例图,Dog是一个Animal)。
- 实例化:创建一个类的实例,类的具体对象。
- 方法:类中定义的函数。
- 对象:通过类定义的数据结构实例。对象包括两个数据成员(类变量和实例变量)和方法。
- 类与对象的关系:类相当于创建对象的模板,根据类可以创建多个对象
- 类的构成:类的名称、类的属性、类的方法
- 类的定义
实例21:
1 | #### |
- 类的命名规则按照“大驼峰”,首字母大写
- 定义的方法默认要传入一个self参数,表示自己,self参数必须是第一个参数
- 创建对象:对象变量名 = 类名()
实例22:
1 | #定义类 |
结果:
1 | 1379489803568 |